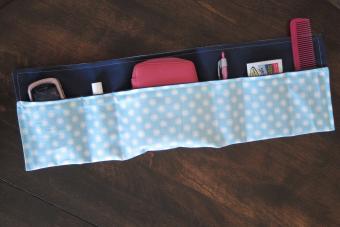
If your purse is full of small items and you often find yourself digging around for your lip balm or cell phone, sewing a purse organizer can be a great solution. This type of organizer, which is easy to make using a free pattern, helps you keep all of your necessities right at your fingertips.
How to Make a Purse Organizer
You don't need a lot of previous sewing experience to make this purse organizer. All you need is the free pattern and about half an hour of your time. You can even customize the design to fit your needs perfectly.
This design works in almost any style of handbag. The finished size is six inches tall, which means your purse or tote bag needs to have an interior height of at least that. To make the organizer larger or smaller, simply use your computer to increase or decrease the size of the pattern.
Things You'll Need
- Computer and printer
- 1/4 yard cotton duck
- 1/4 yard quilting cotton
- Sewing machine and thread
- Scissors, pins, and dressmaker's pencil
- Iron
What to Do
- Begin by printing out the free pattern. Simply click on the image to download the PDF file. Then enlarge it as directed and print it out. Use the pattern to cut out the two pieces you'll need for your organizer. One will be cotton duck, and the other will be quilting cotton.

Click to print the pattern. - Stack both pieces with their right sides together and pin around all four sides. Starting on one of the long sides, sew around three sides of the rectangle using a 1/2 inch seam allowance. Trim your thread tails. Then clip each corner at a diagonal, careful not to clip through your stitching.
- Turn the organizer right side out and use an iron to press it. When you reach the open end, turn the fabric in 1/2 inch to hide the raw edges. Pin the open end but don't sew it. Use the iron to crease the turned edges in place.
- Top stitch one long side of the organizer 1/4 inch from the edge. Place the organizer on your work surface with the cotton duck side up. Grasp the long side on the bottom and fold it up as marked on the pattern. For reference, you should have two inches of cotton duck showing at the top. Secure it in place with pins.
- Starting at one of the folded corners, top stitch 1/4 inch from the edge almost all the way up to the corner. When you are 1/4 inch from the corner, lower your needle and lift your sewing machine foot. Pivot 90 degrees and continue top stitching across the top. When you reach the other corner, pivot and continue down to the bottom.
- Use the dressmaker's pencil to mark the lines for the separate compartments as shown on the pattern. If you want to modify the dividers to fit specific items, this is the time to do it. Starting at the bottom of the organizer, top stitch along each line to create your compartments. Clip all thread tails.
Helpful Tips
Keep these tips in mind as you work:
- For top stitching, increase your machine's stitch length to 3.5. This provides a neater, more professional look.
- To keep your lines straight when sewing the compartments, use a ruler with your dressmaker's pencil.
- Before you sew your compartments, gather all the items you'll need to carry in your purse. Then measure each one to get the custom fit you need.
- To use the organizer, simply curl it up on itself in your purse or tote bag.
Practical and Attractive
You'll find that this organizer is so easy to sew that you may choose to make one in colors to match each of your handbags. These also make great gifts, since they are both practical and attractive. Have fun combining colors and fabrics to make your own custom designs.


