Whether they're getting ready for a Halloween party or simply having fun on a gloomy day, there are a number of kids' face painting ideas you can use to help your children express their creativity. Face painting is also a safe alternative to wearing a costume mask that could obscure a child's vision.
Face Painting Designs for Kids
The sky's the limit when it comes to selecting face painting designs for children. Designs can be simple or elaborate, depending upon your artistic confidence and level of painting experience. From animals to clowns, there are numerous ways to use face paint to create some stunning results.
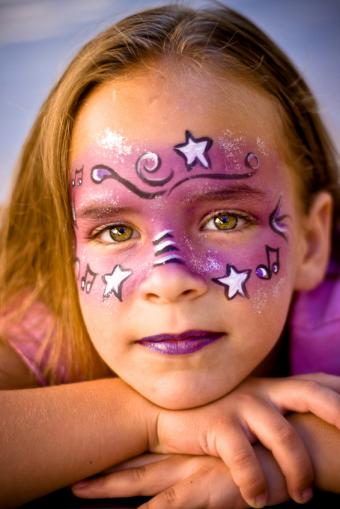
Purple with Stars

Create a fun, celestial scene on your child's face in any color with this design.
Materials
- Light purple face paint
- Wedge applicator
- White face paint crayon
- Black face paint crayon
- Glitter
Instructions
- Apply a thin layer of light purple or other colored face paint around the eye area, across the nose and midway up the forehead.
- Draw a few stars on the face with the black crayon and fill in their interior with white.
- Add a few musical notes to the stars if desired.
- Draw a few black lines across the bridge of the nose, and top with white lines for highlights.
- Draw a few black curlicues across the forehead and highlight them with white.
- Accent the outer eyes with small lines or curlicues accented with white.
- Apply purple face paint or a matching shade of lipstick to the lips.
- Apply some glitter to the edges of the design to finish.
Butterfly Face Paint

This colorful butterfly is perfect for any event at any time of year. Vary the colors if desired to get different looks.
Materials
- Yellow face paint
- Dark orange face paint
- Wedge applicators
- Black face paint crayon
- Red lipstick
Instructions
- Apply yellow face paint around the eyes and onto the cheekbones with a wedge applicator.
- Apply orange face paint around the yellow, down to the middle of the cheeks and forehead. Blend the two colors together where they meet.
- Draw a circle between the eyebrows for the butterfly's head and draw two interlocking ovals just below it. Fill them in with black paint.
- Draw two curlicues coming off the head as antennae.
- Use the black crayon to outline the "wings" of the butterfly. Curl the ends of each line around for detail.
- Draw several black dots beneath each eye on the wings.
- Finish with red lipstick.
Delicate Flowers

This is a subtle design that's perfect for spring fairs, or any time a floral touch is desired.
Materials
- Pale yellow face paint
- Dark yellow face paint
- Purple face paint
- White face paint
- Small makeup brushes
Instructions
- Use a small-tipped brush to draw four hearts in pale yellow face paint with their points touching to create each flower.
- Fill in the tops of each heart with the pale yellow paint.
- Layer the darker yellow paint just below the tops of each petal.
- Fill in the centers where the points meet with purple face paint.
- Add some thin white lines to resemble dandelion puffs around the outsides of a few of the flowers.
- Add a few white curls and dots around the outsides of other flowers to highlight them.
- Vary the sizes of the flowers and the different embellishments around the face as you go, moving from one cheek across to the center of the forehead.
American Flag

Make a patriotic statement with this flag face paint. This simple design is easy to create on just about anyone.
Materials
- Red face paint
- White face paint
- Blue face paint
- Makeup brushes
Instructions
- Draw a large square around the right eye up to the top of the forehead, out to the side of the face and across the top of the right cheekbone in blue face paint.
- Fill in the square completely with blue paint.
- Starting with the red face paint, draw alternating red and white lines beginning at the top of the blue square and extending out to the left side of the face. Remember to keep each of the lines the same thickness, and to go over the lips as well.
- Apply white face paint with a small brush to the interior of the blue square to make stars. Keep the stars in even rows, making them as small as you can to fit in as many as possible, while having them remain visible as stars.
Clown Face Paint

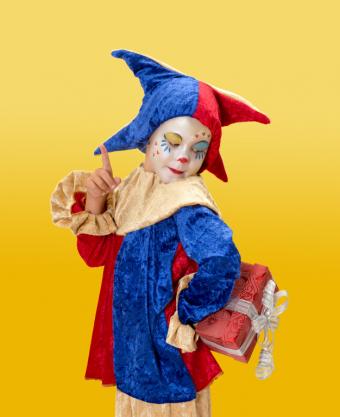
This pretty clown face is easy to apply, and makes a great addition to any event.
Materials
- White face paint
- Wedge applicator
- Yellow face paint
- Blue face paint
- Red face paint
- Small brushes
- Red lipstick
Instructions
- Cover the entire face with an even layer of white face paint using a wedge applicator.
- Apply a layer of yellow face paint to the lid of the right eye, extending up to the brow bone.
- Apply a layer of blue face paint to the lid of the left eye, extending up to the brow bone.
- Draw blue lines to represent eyelashes below the right eye.
- Draw yellow lines to represent eyelashes below the left eye.
- Draw some small hearts with red face paint in an arch above the left eye and below the right eye.
- Color the tip of the nose with red face paint and apply red lipstick to finish.
Tips for Face Painting
Keep the following tips in mind for painting faces:
- When face painting, always choose your supplies carefully. Only buy supplies that are designed specifically for face painting, since other materials may cause skin irritation or allergic reactions. Never use washable markers or acrylic paint for face painting and be very cautious when using glitter near a child's eyes.
- To reduce the spread of illness, do not practice face painting on a subject who has open sores on his/her face. It's also a good idea to clean your brushes thoroughly between customers and have hand sanitizer readily available.
- If you're face painting for a large group of children, you'll want to learn to recognize the signs of head lice. Face painters must often hold a child's head when working, which increases the risk of transferring lice.
- Have a plan when you're working on a child's face. Although most kids' face painting ideas are fairly simple, they do require the subject to sit still. Unfortunately, children are typically quite impatient. To save time, invest in stencils for hearts, stars, balloons, and other common face painting designs. You can also combine simple face painting designs with temporary tattoos.
- Using good makeup application techniques will create the most attractive designs. To prevent cracking, apply face paint in thin layers. Use makeup sponges to quickly cover a large area. Let your base color dry before you apply additional colors to the design. If you don't, the colors will run together.
Setting Up a Face Painting Booth
Face painting is often a popular fundraiser for schools and other children's organizations. If you'd like to set up a face painting booth, consider the following suggestions:
- If you're going to be painting for several hours, organize your schedule to allow for frequent breaks.
- To prevent unreasonable requests, have a chart available with designs that you are able to do.
- As you're painting one child, talk to the next child in line about what design he/she would like. Since children are often indecisive, this helps the process go more smoothly.
- To reduce the strain on your back, have a high stool available for your face painting subject.
- Keep a mirror handy so children can easily view your finished design.
Practice Makes Perfect
You don't need to have the skills of a professional artist to create a memorable face painting experience for a child. With patience and a little practice, you can learn to make designs that kids will love. Remember to take pictures of each child when you are finished; snapshots make great souvenirs for the kids and provide a handy reference for you to use in developing your face painting technique.


